ModCloth
Showing posts with label patterns. Show all posts

Sunday, August 23, 2015

Baby Blanket Flower & Leaf Details ~ Chart Translation

The baby blanket is *finally* complete and I cannot wait to share it with you!
 
A few weeks back I found a crochet baby blanket on Pinterest that led me to a chart. No written pattern, just a punch of symbols.
 
 
 Well, I like a good puzzle, and even though I knew what all the symbols meant, I like to have my patterns written out.
12 pages of notes later, here we are!
 
I will be starting with the details of the blanket, the flower and the leaf.


There will be a written pattern, as well as some pictures along the way for a visual.
 
For the blanket, I used baby weight yarn with a F/5 - 3.75mm hook.
I will be using those, as well as worsted weight yarn with a H/8 - 5mm hook for examples/pictures in this post.


Let's get started!
 
 
Small & Large 6-Petal Flower
 
Small Flower:
(Make 8)
 
Start with a magic circle (a great video tutorial can be found HERE by Moogly)
 
1.  ch 5 (counts as dc and ch 2) - * dc in circle - ch 2 * - repeat from * to * 5 times - join to 3rd ch of beginning ch 5 - pull circle closed. {6 dc and 6 ch sps. total}
 
2. sl st to ch sp. - ch 1 - (sc - ch 2 - 3dc - ch 2 - sc) in ch sp - * sl st to next ch sp - (sc - ch 2 - 3dc - ch 2 - sc) in ch sp * repeat from * to * 5 times - join to beginning ch 1 {6 petals made}
 
3. ch 1 - sc in same st - working behind petals, * ch 5 - sc in dc from Round 1 * repeat from * to * around - join to first sc

 
4. ch 1 - (sc - hdc - 5dc - hdc - sc) in each ch 5 sp around - join to beginning ch 1 - FO for SMALL FLOWER ONLY - weave in ends


Large Flower:
(Make 4)

 
5. ch 1 - sc in same st - working behind petals, * ch 6 - sc in sc from Round 3 * repeat from * to * around - join to first sc
 
6. ch 1 - (sc - hdc - 7dc - hdc - sc) in each ch sp around - join to beginning ch 1 - FO - weave in ends


Light pink flower is made with baby weight yarn and smaller hook.
Dark pink and purple flowers are made with worsted weight yarn and larger hook.
 
Now that the flowers are done, it's time for some leaves!
 
Leaf:
(Make 12)
 
ch 11 - sc in 2nd ch from hook - hdc in next - dc in next 6 chs - hdc - sc in last ch (10 sts) - ch 1


continue working on opposite side; sc - hdc - dc in next 6 - hdc - sc - join to first sc - FO - weave in ends.


Pink leaf is made with baby weight yarn and smaller sized hook. Green leaf is made with worsted weight yarn and larger hook.


Please note: This pattern is NOT my own. I have written the original chart out into crochet terms to hopefully make it easier to follow. Please click the link above for the original site. If you find any problems with this pattern, please let me know in the comments below. Thank you.


Thursday, April 23, 2015

Mario Themed Crochet Pixel Blanket - Part 1

"It's a-me, Mario!"
 
 
My little muse came up with another great idea that had my gears turning in no time!!
What would I do without this guy??
 
 
He always has a way of coming up with ideas that keep me busy creating for days.....
 
His latest plan involves Mario and me making it in to a blanket.
My first thought was, "graph patterns to the rescue!!" So, I went on a mission via Pinterest and found some that I could work with.
 
Next, I searched for a mini square pattern to determine each square's size and eventually how large each graph would be.
I knew for this pixel blanket, I wanted a closed square. Unlike the granny squares I made for Little C's butterfly baby blanket.
 
 
I ended up using a 2" square from Elisabeth Andree of About Crochet.
(Pattern found HERE!)
 
The smaller square allows me to use 9 - 16x16 graphs in the blanket's finally design; or 3 stacks of 3.
 
Do you like how all the numbers are starting to come out??
My *favorite* subject EVER! (enter sarcasm here)
 
My final measurements of the blanket will be approximately 108" x 108", including a border.
That's the same as a King sized blanket!!
 
 
~~~~~*~~~~~*~~~~~*~~~~~*~~~~~*~~~~~
 

Each block/graph has 256 squares total and with 9 blocks, that's 2,304 squares *all* together......
 
 
~~~~~*~~~~~*~~~~~*~~~~~*~~~~~*~~~~~

 
Needless to say, I don't see this blanket being finished any time soon..... Maybe by Christmas??
 
 
~~~~~*~~~~~*~~~~~*~~~~~*~~~~~*~~~~~


I suppose I could make the blanket smaller, but why not go big, right??
 
The final choice of each character block was Big C's, with a little persuasion from me whenever we needed to mix up the colors.
 
There are 17 colors being used.... and let me tell you people, this is where yarn hoarding comes in handy!! Be sure to explain this to your significant others the next time they complain about you sneaking in a few more skeins ;)
 
 
I will do my best to update as I crochet along, until then, stop by Graph Patterns board on Pinterest and start getting some pixel blanket ideas of your own!


Thursday, April 2, 2015

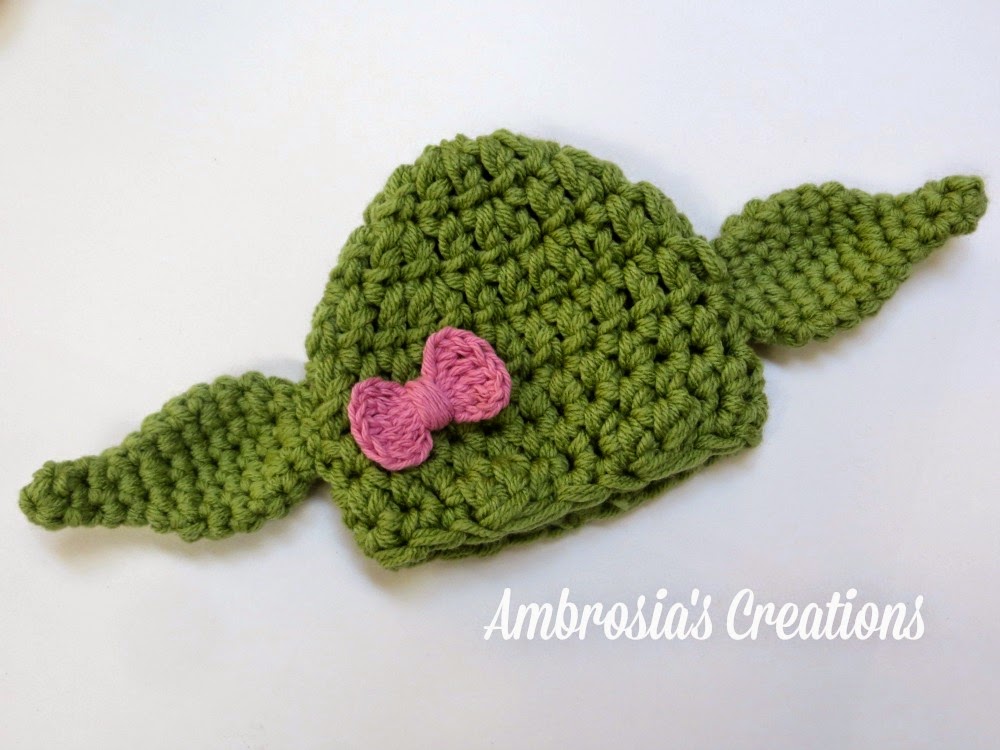
Yoda Needs A Kimono.....

I was recently contacted through my Etsy shop for a customization of the Yoda Newborn Photography Prop and let me tell you, I was excited!!
 
The request was to completely get rid of the cape and make a Kimono sweater instead, plus, add a detachable pink bow to the hat.
Hello, challenge!!


Thankfully, Abigailology has this amazing pattern that was perfect for what the customer was looking for. Her pattern calls for a fingering weight yarn, which makes this sweater light, stretchy and super soft. I love how it turned out and I hope it's new owner will too!
 

You can find the pattern on Etsy HERE or on Ravelry HERE.


For the detachable bow, I used a favorite pattern of mine by Daisy Cottage Designs with 100% cotton yarn. I'll glue a piece of felt to the back, then glue the felt to an alligator clip. Easy peasy....
Get the free pattern for the bow HERE.
 
 
I just love how all of the pieces turned out and am thinking of making the kimono sweater an option for the Yoda Set, as well as the detachable bow.
 
What do you think?? 


Tuesday, August 26, 2014

Round Up:: National Dog Day Crafts & Activities

It's National Dog Day!!!! 
Do you have a furry doggy friend?? We have two!!

Maggie May


We adopted her from the Humane Society at 1.5 years old. She has been with us for almost 7 years now and has always loved one thing...... SLEEPING!! Her biggest 'pet' peeve is if you trim her bangs and she loves and good massage in the bath.

LouAnn 


This sweet girl was left in a friends driveway with her two brothers by some stranger. She has been with us for almost 3 years. LOVES to play catch and snuggle. Her new best friend is Edwyn, a kitten we recently rescued from the same friend we got LouAnn from.
~*~*~*~*~*~
Now that I have shared our two furry friends with you, let's get to this round up!!
I tried making this post friendly for all types of crafters, enjoy!


1. Recycled T-Shirt - Dogs Tugga Toy from craftbits: Great way to up-cycle those old t-shirts AND get a super awesome toy that your dog would love!

2. The Lady Who Lunches Dog Sweater from Lion Brand: Here is a crochet pattern that I have *loved* since the day I saw it! I know a small female dog that would look too cute in it!

3. I - Matey Dog Coat from Yarnspirations: You can't lose with this knitted skull sweater! It could even be used for a Halloween costume. (Stay tuned for that round up closer to the holiday!!)

4. Crochet Puppy Dog Lovey Blanket by Repeat Crafter Me: Sarah, the genius behind Repeat Crafter Me, has the cutest ideas that I share often. This puppy dog lovey is just one of *many* creative things she comes up with. (She even has some puppy hats....look here!!)

5. Blooming Dog Crochet Costume from Red Heart: I know I should save the costumes for Halloween, but this is too hilarious and cute NOT to share, so enjoy! :)

6. Easiest Dog Up-Cycled Dog Collar Ever by Sew Doggy Style: The name speaks for itself!! If your dog isn't the sweater type, maybe they like collars or bow ties! I am a new follower of the Sew Doggy Style site and love what she does. You should swing by and check her out!

FOR THE KIDS:

7. Footprint Puppy Dog Craft from Crafty Morning: I adore kid arts & crafts that involves their little hands, feet, fingers and toes. Those are the ones that come with a requirement to keep forever!

8. Paper Bag Animal Puppets from 86 Lemons: This is originally a Martha Stewart craft with no template to be found, but thanks to Livvy, there is one for the puppy and the pig! Wouldn't it be fun to do a whole barnyard?! 

9. Dog From Hearts Papercraft (Template) from Grade ONEderful: I renamed this because I plan on using the template to practice tracing & cutting; plus, using a construction paper background to create a story, instead of another paper bag puppet. The great thing about templates, is that the options are endless.

Last, but not least...... are you ready to become the coolest parent in the history of parents??...........

10. How To - Balloon Dog from Parents Magazine: If you already know how to do this, don't spoil my fun! I don't have any balloons, but this is a pretty cool reference for in the future. Great idea for a Carnival themed party too!!


Happy National Dog Day, everyone!!!

We are off to make some puppy crafts!

P.S. Don't forget to share some love for our furry friends in need. Check your local shelters for what they need most; handmade items are great donations.


Friday, August 15, 2014

Crochet Free Pattern Round-Up ~ Fall Sweaters

Cooler weather is just around the corner, which means it is about time to get started on those sweaters!!


Here are my 5 favorites that I picked while I was browsing:


1.Penny Arcade by Yarnspirations: An Intermediate pattern in sizes S - 3XL. Open worked and over-sized, this piece is sure to be a hit this fall season! If made with a nice wool fiber, it's guaranteed to keep you warm, even with all the giant holes.


2. Country Rose by DROPS Design: Pattern available in sizes S - 2XL. Even though I may have found this pattern in the Summer section, I think it would be great for Fall too! Simple, yet elegant.

3. Lace Sweater from DROPS Design: Pattern available in sizes XS - 2XL. I *LOVE* the classic look of this sweater. The ruffle around the bust and single bit of accent color for the trim is what I love the most. This pattern has options for a stripe look or solid, like the one shown.

4. Drapey Cardigan from Red Heart: An easy pattern in sizes S - 3XL. This drapey cardigan with three-quarter length sleeves is just right for the Summer to Fall transition. Make it in your favorite color or a neutral tone so it can go with multiple outfits.

5. Cowl Neck Sweater from Lion Brand: Another easy pattern in sizes XS - 2XL. What isn't there to love about this one?? It looks extra comfy and has a cowl! The pattern is labeled as easy and would be perfect for someone who it attempting a garment for the first time.

** BONUS SWEATER **


6. V-Topper from Yarnspirations: Intermediate pattern in sizes S - 3XL. V-neck, slightly snug, extra drapey arms AND a hood....... yeah...... I'm sold!! LOVE, LOVE, LOVE all around!

If you follow me on Facebook, you know that I have already started the Rapunzel sweater, and that one is turning in to a 'rip the stitches' scenario. Makes me sad..... but the V-Topper has me excited to try again!


Friday, August 8, 2014

Finished Project Friday!!

Such an unfaithful blogger I have been...... I would like to blame it on the addition of social media. More status updating than blog posting.
Don't forget, we are on Facebook AND Twitter now!!

I'll take my long absence from blogging to share all the projects that I have been working on lately!!

Hooded towels have been a BIG hit this summer around here. This is what I have done so far:

Butterfly for Little Miss


Olaf for a friend!!


We have an Angry Bird and a Lady Bug in the works!!
You find these free patterns and other great characters over at Crazy Little Projects!!

Next, I have my pinwheel blocks made from Moda Bake Shops Folklore charm pack.


I was able to make 10 - 8" x 8" squares for a small lapghan.

Finally, some clothing pieces that I have been working on forever!!! The Keila top makes me nervous because of the fabric that I am using, but I am determined to make it happen. I mean, I *am* at the point of no return on it.


The yoke and the main piece are all finished. I just need to attach them together. Wish me luck!!!

I also made a shirt for Little Miss as request by her Auntie Liz....as if that wasn't obvious :)


No screen printing here folks!! That's all freezer paper and exacto knife. Yes, I cut all those letters out, by hand, with a teeny tiny blade...... Not perfect, but way cute.

Last, and definitely not least, MY DESK!!!!!!


I added a stencil on each corner with some darker stain and now all it needs is its finish coat and to be hung on the wall!! I am SO SO SO excited for this to be finished and hope it adds some organization to my chaotic office that is spread through-out the dining room!

~*~ Hope everyone has a creative weekend!! ~*~


Monday, July 7, 2014

Weekend Review - Fabric, Yarn & Fun

There have been many things going on here, let me tell you. Mostly ideas being gathered and then scattered, but it all leads to something in the end, right??

Let's start with my first Etsy purchase, vintage sheet fat quarters!!!!


Midwest Vintage Co. has a great collection of vintage fabrics and her latest shop announcement is that she is selling her stash, so get them while you can!!
I picked the floral fat quarter bundle and a random fat quarter bundle.


Love them all!! They have inspired me to keep an eye out for vintage sheets on my estate sale adventures!

If you were following on Facebook, you know I set the pattern increase aside for the Pineapple Market Bag to work on what I call, 'Nana's Hug'. I have finally finished all 55 squares and 11 triangles!!

Please excuse the horrible picture. Getting antique white on white is quite tricky!


Moving on to weaving in those pesky ends, sewing the piece together and then adding an edging.

You can find the original pattern for this piece here!

Finally, I took advantage of the Independence Day sale at Jo-Ann's and snagged myself some fabric and way more yarn than I planned; only because it was on amazing clearance. 
(Oh, clearance.....why you always get me in so much trouble? Hmmm?)


ALL THE POSSIBILITIES!!!!

Let's not forget some holiday fun!


Hope everyone had a creative and festive weekend!!!

Friday, June 27, 2014

Pattern:: Pineapple Crochet Market Bag - Chart & Translation


If you "like" my Facebook page, then you know that I have been working on translating a crochet chart for this insanely cute tote/market bag/hand bag....the name is really your choice!

Link to original site below.

From the picture above, I thought the bag was much larger compared to the picture below.
Link to original site below.


Either way, I liked the design and thought it would perfect for a summer time market bag, or even a jumbo beach bag, with some tweaking of the pattern.
Unfortunately, when I pinned this cute picture on Pinterest, I didn't realize with was a 'chart only' pattern. *insert sad face*
Thankfully, I know how to translate crochet charts!!! At least the more basic ones anyways......

** This post is just for the size above. Stay tuned for larger sizes!**

The pattern below is translated using US terms.

Materials:
  • 100% Cotton Yarn - Lily Sugar'n Cream - Off White or color of choice
  • I/9 - 5mm hook
  • Stitch markers
  • Blunt needle
Pattern:
  1. Start with a magic circle - ch 2 - 16 dc (Note: if magic circles are not your thing; ch 3 - 16 dc in 1st ch). - join with sl st to first dc
  2. ch 3 (counts as dc throughout) - dc in same sp - * 2 dc in next st * - repeat from * to * around - join with sl st to top of beginning ch 3
  3. ch 3 - 2 dc in next st - * dc in next st - 2 dc in next st * around - join
  4. ch 3 - 2 dc in next st - * dc in next 2 sts - 2 dc in next st * around - join
  5. ch 3 - dc in next 2 sts * 2 dc in next st - dc in next 3 sts * around - join
  6. ch 3 - dc in next 2 sts * 2 dc in next st - dc in next 4 sts * around - join
  7. ch 1 - sc in same st - sc in next 5 sts - sk 2 - * 9 dc in next st - sk 2 - sc in next 11 - sk 2 * around - join to first sc
  8. ch 3-(dc-ch 1-2 dc) in same sp - sk 5 sc * dc in next dc (ch 1 - dc in next dc) 8 times - sk 5 sc - (2 dc-ch 1-2 dc) in next st. - sk 5 sc * around - join to top of beg. ch 3
  9. sl st to ch 1 sp - ch 3 (dc- ch 1-2 dc) in same sp * ch 2 - sc in ch 1 sp - (ch 3 - sc in next ch sp) 7 times - ch 2 - (2 dc-ch 1-2 dc) in ch 1 sp * around - join
  10. sl st to ch 1 sp - ch 3 (dc- ch 1-2 dc) in same sp * ch 2 - sc in ch 3 sp (ch3 - sc in next ch sp) 6 times - ch 2 - (2 dc-ch 1-2 dc) in ch 1 sp * around - join
  11. sl st to ch sp - ch 3 (dc- ch 1-2 dc) in same sp * ch 2 - sc in ch 3 sp (ch 3 - sc in next ch sp) 5 times - ch 2- (2 dc- ch1-2 dc) in  ch 1 sp* around - join
  12. sl st to ch 1 sp - ch 3 (dc- ch 2- 2 dc- ch 2- 2 dc) in same sp * ch 2 - sc in ch 3 sp (ch 3- sc in next ch sp) 4 times- ch 2 (2 dc- ch 2- 2 dc- ch 2) in ch 1 sp* around- join
  13. sl st to ch 2 sp- ch 3 (dc- ch 1- 2 dc) in same sp- ch 1- sk 2 dc- (2 dc- ch 1- 2dc) in next ch 2 sp * ch 2- sc in next ch 3 sp (ch 3- sc in next ch sp) 3 times- ch 2- sk ch 2 and 2 dc- (2 dc- ch 1- 2 dc) in ch 2 sp- ch 1 (2 dc- ch 1- 2 dc) in next ch 2 sp* around - join
  14. sl st to ch 1 sp- ch 3 (dc- ch 1- 2dc) in same sp- ch 3- sc in ch 1 sp- ch 3- (2 dc- ch 1- 2dc) in next ch 1 sp- *ch 2- sc in ch 3 sp- (ch 3- sc in next ch sp) 2 times- ch 2- (2 dc- ch 1- 2dc) in ch 1 sp- ch 3- sc in next ch sp- ch 3- (2 dc- ch 1- 2dc) in next ch sp* around - join
  15. sl st to ch 1 sp- ch 3- (dc- ch 1- 2dc) in same sp- *ch 2- sc in ch 3 sp- ch 3- sc in next ch 3 sp- ch 2- (2dc- ch 1- 2dc) in next ch 1 sp- ch 2- sc in ch 3 sp- ch 3- sc in next ch sp- ch 2- (2dc- ch 1- 2dc) in ch 1 sp* around- join
  16. sl st to ch sp- ch 3 (dc- ch1- 2dc) in same sp- *ch 2- sc in ch 2 sp- (ch 3- sc in next ch sp) 2 times- ch 2- (2dc- ch 1- 2dc) in ch 1 sp- ch 2- sc in ch 3 sp- ch 2- (2dc- ch1- 2dc) in ch 1 sp* around- join
  17. sl st to ch sp-  ch 3 (dc- ch1- 2dc) in same sp- *ch 2- sc in ch 2 sp-(ch 3- sc in next ch sp) 3 times- ch 2- (2dc- ch1- 2dc) in ch 1 sp- sk top of pineapple- (2dc- ch1- 2dc) in next ch 1 sp* around- join
  18. sl st to ch sp- ch 1- sc in same sp- * ch 3- sc in next ch sp* around- ending with, ch 1- dc to first sc to create join
  19. ch 1- sc in sp made by joining dc- *ch 3- sc in next sp* around- ending with, ch 1- dc to first sc to create join
  20. repeat row 19 to desired height - do NOT fasten off
Handles - First 1/2: (Tip: use a stitch marker at the beginning and end of row 1.)
  1. turn-*stitch marker 1* (ch 3- sc in next ch sp) 9 times - ch 1- dc in next ch sp-*stitch marker 2*- turn
  2. (ch 3- sc in next ch sp) 8 times- ch 1- dc in next ch sp- turn
  3. (ch 3- sc in next ch sp) 7 times- ch 1- dc in next ch sp- turn
  4. (ch 3- sc in next ch sp) 6 times- ch 1- dc in next ch sp- turn
  5. (ch 3- sc in next ch sp) 5 times- ch 1- dc in next ch sp- turn
  6. (ch 3- sc in next ch sp) 4 times- ch 1- dc in next ch sp- turn
  7. (ch 3- sc in next ch sp) 3 times- ch 1- dc in next ch sp- turn
  8. (ch 3- sc in next ch sp) 2 times- ch 1- dc in next ch sp- turn
  9. ch 3- sc in next ch sp- ch 1- dc in next ch sp- turn 
  10. ch 1- sc in same st- ch 3- sc in next sp- turn
  11. ch 3- sc in ch 3 sp- ch 1- dc in sc of previous row- turn
  12. ch 1- sc in same st- ch 3- sc in next ch sp- turn
  13. -  24. repeat rows 11 & 12; 6 times Note: For a longer strap, continue with pattern, always ending with row 11
   25. repeat row 11 - fasten off

Handles - Second 1/2:
* Join yarn with a sl st 10 ch sps from the beginning row of the first half of the handles. (stitch marker 1; see how the stitch marker came in handy?!)

   1 - 24. Continue the same as the first half of handle (above)
   25. Joining row; ch 2- sl st to dc of row 25 on first strap- ch 1- sc in ch 3 sp- ch 1- sl st to ch sp on first strap- ch 2- sl st to sc to join- fasten off- weave in ends

You have just completed your first handle!! Well, almost ;)

For your next handle & strap combo, you are going to do exactly the same as the others.

* Join yarn with a sl st 10 ch sps from the end of your beginning row 1 (stitch marker 2) and continue the handle pattern, First and Second 1/2, as above.

To finish, evenly sc around the inside and outside of the straps, weave in the ends and enjoy your new bag!!
Note: the chart shows specific placing for the finishing sc edge, but I just eye balled it to make it easier :)

So far, I have made a bag with the original pattern size and a jumbo version. I say jumbo (x-large size in pattern), because the thing is huge when I start piling in all my goodies!!!

Here is my completed version of the pattern above:


~~*~~ NOTE: This pattern is NOT my own. I have only translated the original chart to the best of my knowledge. If you come across any errors, or anything that sounds confusing,  please let me know so I may make the proper adjustment(s). You can find the link to the original site, along with the diagram above. ~~*~~

Have a great weekend!!!

** Edited 7/7/2014 to add pictures of my completed version **


Saturday, May 17, 2014

Round-Up:: 5 Crochet Summer Tops

The weather has been unusually warm this past week, which had me daydreaming of summer. Tank tops, flip flops, barbecues, camping, concerts, festivals...... and what better way to get ready for summer than by starting to update your wardrobe with this collection of crochet tops!!


  1. Lace Topper designed by Kimberly K. McAlindin for Red Heart Yarns - I love how this top is open-worked, lacy and designed to have a flowing effect. Perfect for summer but may also be used during cooler months with a longer sleeved shirt underneath. The downloadable directions are for sizes S-XL.
  2. Keila Top by Handy Kitty - I like this top so much, I am already working on one! You can also change the design by adjusting almost any square and triangle motif to fit the size you need.
  3. Party by the Pool Cover-up designed by Shannon Mullett-Bowlsby for Yarnspirations - Cover-ups are all over the place and who doesn't love something that has a hood on it? Pattern available in sizes S-4XL
  4. Crochet Scalloped Top from Yarnspirations - I love the scalloped look of this design, however, I would most likely use a different yarn than the suggested Simply Soft. Never had much luck with that type of yarn and garments. Pattern available in sizes S-2XL
  5.  Open Air Shrug from Lion Brand Yarns - Another over-sized piece that I just love, love, love! There is something about this shrug that has a 'free spirit' feel to it.  This is guaranteed to be made this year, for myself, of course! Pattern is available in sizes S-2XL.  
I will be working on the Keila Top this weekend since the rain has found it's way back to us *and* finishing two shop pieces! Hopefully, your weekend has brought you better weather than me. In case it hasn't, maybe this round-up will inspire you to start a project where you can at least dream of the sunshine!

Happy Saturday!!

Thursday, April 17, 2014

It's Almost Easter!!!

I feel like I slack in the holiday entertainment department once Christmas is over, but I am definitely trying! And, in case you are feeling just like me, slightly overwhelmed with how fast things keep sneaking up on you, here is a round up of Easter themed projects we are going to be doing around here.

That's right, she has two because she is *that* crafty!
I absolutely love the modern, chevron twist to the traditional Easter egg! And the bunny hat with a link to a matching diaper cover? Yes, please!!


What a great way to use up some potatoes, entertain the kids and make some art!! There are examples on how to create bunnies and chicks too!


Is there really anything that needs to be said here? I mean, it's a bunny scene tucked away in an egg!! Why wouldn't you want to make this??


Cayley is turning in to a lover of dolls and this Easter Lily Doll is my favorite out of the entire line-up that Yarnspirations has. I can't wait to see how it turns out!


Carson is going to go crazy when I let him make this yarn bowl!! Great way to use up scraps, let the kids get messy and get a pretty awesome looking bowl out of it in the end!


Well, that's all folks! Just enough to keep everyone busy for the next few days and get in the groove of Easter festivities!! 


Saturday, March 29, 2014

DIY:: Bean Bags

Time for another project from the sewing roundup I posted here!

Today, I am showing you how I created the bean bags!!

 For this tutorial, I am using the numbered bean bags that I made for Big C to work on his math. I have another set in the works for Little C and a separate, plain, set for a bean bag toss game (stay tuned for that post!).

With this post by Holly at Chez Beeper Bebe as my inspiration, I created these super fun bean bags with more of those pesky fabric scraps that I have lying around. The only change that I made was using freezer paper and fabric paint to paint on the numbers instead of sewing them as an applique. 

Here are the supplies I needed for this project:
  • Scrap fabric - patterned
  • Muslin
  • Freezer paper
  • Exacto knife (or scissors)
  • Fabric paint
  • Paint brush
  • Stencils of choice (optional)
  • Beans!!!
  • Needle & thread

First, cut 10 - 4.5" squares from your patterned/solid fabric and 10 - 4.5" squares from your muslin.


Next, trace your stencil on to the freezer paper.


Using your exacto knife and/or scissors, cut out the stencil and iron it onto your muslin.

After cooling, put the squares on top of a piece of cardboard and paint each stencil with your fabric paint. I put about 2-3 small drops on each piece, then brushed them around.

* Add a second coat if needed. *


Once completely dry, remove the freezer paper.


Now, we are going to sew! :)
Place the patterned and muslin piece right sides together and pin in place.
Sew with 1/4" seam allowance around the square, leaving a small gap on one side for the beans.
Clip your corners.


NOTE: For my second batch of bean bags, I left my gap in the middle of one of the sides. This made it easier to flip and fill.

Flip right side out and push out your corners, making them pointy >
Next, fill with beans, making sure not to overfill. I used about 1/3 cup of beans for each bag.


Hand sew your little seam closed using either the whip-stitch method mentioned in Chez Beeper Bebe's tutorial, or whichever your preference is. I ended up using a ladder stitch to try and hide the seam better.

*There is a great example of the ladder stitch, along with many other stitches here!*


Aren't these fun? And who knew they would be so easy?!? Not only are they entertaining, they can be used for learning and I like learning. Especially when it is associated with play.


I am using these, Little C's bean bags and my next project, the hooded towels, for an Easter gift. It's a ways away, but I need to plan at least a month ahead in my crazy life for everything!!


Hope these bean bags inspire you to create some of your own and please share if you do!